微信开发常见问题02
微信开发常见问题02
微信开发常见问题02
屏幕选择
1
2
3
4
5
6
7
8
9
10
11
12
13
14
15
16
17
18
| 建议: 开发微信小程序时设计师可以用 iPhone6 作为视觉稿的标准。
注意: 在较小的屏幕上不可避免的会有一些毛刺,请在开发时尽量避免这种情况。
iPhone6: 1rpx = 0.5px 1px = 2rpx
#屏幕rpx转为px
function rpxToPx(rpx) {
const windowInfo = wx.getWindowInfo();
const screenWidth = windowInfo.screenWidth;
return (rpx * screenWidth) / 750;
}
#屏幕px转为rpx
function pxToRpx(px) {
const windowInfo = wx.getWindowInfo()
const screenWidth = windowInfo.screenWidth
return (px * 750) / screenWidth
}
|
1
2
3
4
5
6
7
8
9
10
| <view>
<view> 尺寸参考标准 </view>
<view style="width: 750rpx; border: 1px solid red; color: red">
<view style="width: 375px; border: 1px solid blue">标准尺寸</view>
</view>
<view style="width: 740rpx; border: 1px solid red; margin-top: 30px; color: blue">
<view style="width: 360px; border: 1px solid blue"> 调试尺寸</view>
</view>
</view>
|
官方: 尺寸单位
常见颜色
1
2
3
4
5
6
7
8
|
background-color: #f5f6fa;
background-color: #f5f6fa;
background-color: #F6F8F9;
background-color: #f8f9fb;
|
分享
微信原生分享功能
在小程序页面中,定义 onShareAppMessage 方法:
1
2
3
4
5
6
7
8
9
10
| > Page({
> onShareAppMessage: function (options) {
> return {
> title: '自定义分享标题',
> path: '/pages/index/index',
> imageUrl: 'https://cdn.uviewui.com/uview/swiper/1.jpg',
> }
> },
> })
>
|
- 在页面上添加按钮
1
2
| > <button open-type="share">分享</button>
>
|
- xxx
分享官网 onShareAppMessage
官方示例项目
微信官方示例代码导入到本地后路径C:\Users\fei\WeChatProjects 和 minicode-1
自定义tabBar
1
2
3
4
5
6
7
8
9
| #自定义步骤
01)miniprogram/app.json 中 "custom": true,
02)组件 custom-tab-bar
02-2) 注意点: custom-tab-bar 中的配置要和 app.json 中保持一致
02-3) 使用自定义tabbar, 在启动页要使用一个空白页面,然后在使用 switchTab 跳转到第一个页面
onLoad(options) {
wx.switchTab({ url: '/pages/index/index首页的tabbar' })
}
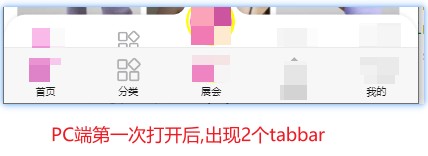
#如果不使用这个, 小程序在PC端第一次打开后会出现样式重叠现象
|
- 官网: 自定义 tabBar
- 官网回复: 暂时无更优解决方案
- 自定义tabBar,PC端第一次打开异常

国际化i18n
1
2
3
4
5
6
| internationalization: 国际化
i18n = internationalization
i18n之所以叫i18n是因为次单词长度为20,以i开头以n结束,i和n之间间隔18位。
使用依赖: miniprogram-i18n-plus
|
路由-页面跳转
1
2
3
4
5
6
7
8
9
| !!!路由跳转注意别超过层级
wx.navigateTo() 这个方法页面栈最多10层,超过10层后要特殊处理
01)第一种: 合理使用使用 wx.redirectTo()、wx.reLaunch()、wx.switchTab()
02)第二种: 判断当前层级: let pages = getCurrentPages(); 可以获取当前层级数量,然后判断超过后处理
if(pages.length > 1){
wx.navigateBack({delta: 1}) 返回上一级页面。
}else{
wx.switchTab({url: '/pages/index/index'}) 跳转到指定页面
}
|
官网: 路由
跳转与消息提示
1
2
3
4
5
6
7
|
wx.navigateBack({
delta: 1,
success() {
wx.showToast({ icon: 'none', title: '操作成功' })
}
})
|
顶部距离相关数据
1
2
3
4
5
6
|
const menuInfo = wx.getMenuButtonBoundingClientRect()
const windowInfo = wx.getWindowInfo()
windowInfo.statusBarHeight;
|
1
2
3
4
5
6
7
| const windowInfo = wx.getWindowInfo()
const statusBarHeight = windowInfo.statusBarHeight
const menuInfo = wx.getMenuButtonBoundingClientRect()
const barHeight = statusBarHeight + menuInfo.height + (menuInfo.top - statusBarHeight) * 2
const barHeight2 = menuInfo.bottom + menuInfo.top - statusBarHeight
|

1
2
3
4
5
6
7
8
9
| const windowInfo = wx.getWindowInfo()
const screenWidth = windowInfo.screenWidth
const info = wx.getMenuButtonBoundingClientRect()
const navigationBar = {
leftWidth: info.width + (screenWidth - info.right) * 2,
rightWidth: info.width + (screenWidth - info.right) * 2
}
|

- 官网: 菜单按钮
底部距离iPhoneX
1
2
3
4
5
6
7
8
9
10
11
12
13
14
15
| 手机 iPhoneX 底部有个黑条,需要处理一下底部距离
const windowInfo = wx.getWindowInfo()
const safeAreaHeight = windowInfo.safeArea.top
let is_iPhone_X = false
if (safeAreaHeight > 20) {
is_iPhone_X = true
} else {
is_iPhone_X = false
}
|
背景图与js
背景图如果用js加载出来的,这时候background 会覆盖css中的属性background-repeat
1
2
3
4
5
6
7
8
9
10
11
12
13
14
15
16
17
18
19
20
21
22
23
24
|
<view
class="search background"
style="height:{{barHeight}};background:url({{logoBg01}}); background-size: 100% {{barHeight}}"
>
</view>
<script>
const logoBg01 = "https://interactive-examples.mdn.mozilla.net/media/examples/hand.jpg";
const barHeight = '380px'
</script>
<style>
.search.background {
width: 100%;
position: fixed;
left: 0;
top: 0;
background-repeat: no-repeat !important;
}
</style>
|
配置文件
project.private.config.json
1
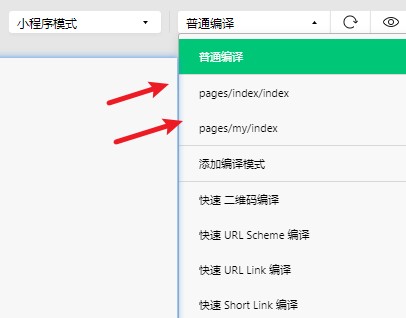
| condition/miniprogram/list 这个配置项,定义测试起始入口页面, 方便测试的时候用的
|
1
2
3
4
5
6
7
8
9
10
11
12
13
14
15
16
17
18
19
20
21
22
23
24
| {
"setting": {
"compileHotReLoad": true,
"urlCheck": false
},
"condition": {
"miniprogram": {
"list": [
{
"name": "pages/index/index",
"pathName": "pages/index/index",
"query": ""
},
{
"name": "pages/my/index",
"pathName": "pages/my/index",
"query": "",
"scene": null
}
]
}
},
"description": "项目私有配置文件。
}
|

app.js
1
2
3
4
5
6
7
8
9
10
11
12
13
| "window": {
"navigationBarTitleText": "首都国际会展中心",
"navigationBarTextStyle": "black",
"navigationBarBackgroundColor": "#ffffff",
"navigationStyle": "custom"
},
"tabBar": {
"custom": true,
"color": "#000000",
"selectedColor": "#166BFB",
"backgroundColor": "#ffffff",
"list": []
}
|
字体问题
1
2
3
4
5
6
7
8
9
10
11
12
|
wx.loadFontFace({
family: 'TencentSans',
source: 'url("https://www.tencent.com/font/TencentSans-W3.woff")',
global: true,
success: console.log,
fail: console.log
})
|
生命周期与接口
底部
- 官网: 基本语法
- xxxx


