Android入门之hello world
Android入门之hello world
Android入门之hello world
Android Studio 2022.3.1 软件安装步骤略过,注意: 这个安装过程第一次很慢,尽量使用网线安装
第一个程序
- 第一个程序
hello wolrd的创建
- 在使用新版
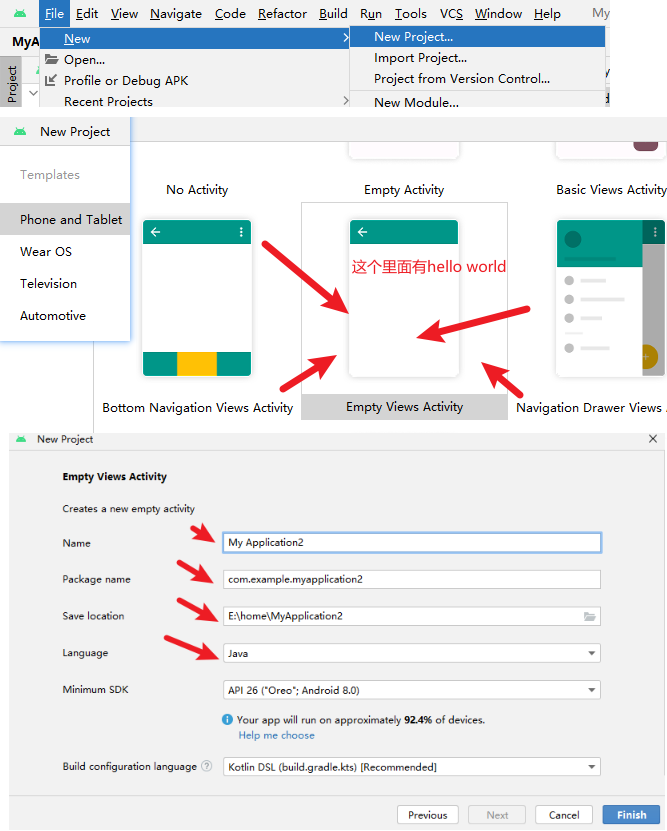
Android studio2022.3.1创建Empty Activity工程时会遇到没有语言选项,默认创建的工程是kotlin语言
- 所以我们创建的时候选择
Empty Views Activity,这个里面就有选择语言,并且创建完后,有hello world

模拟器
1
2
3
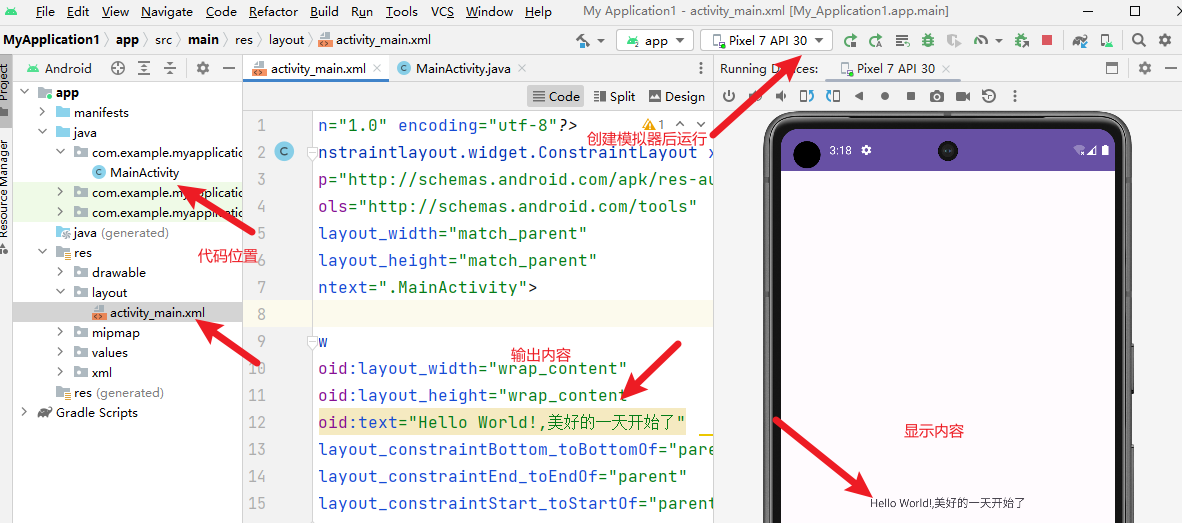
| 模拟器我习惯用: Pixel 7 API 30, 这个手机有返回键,用起来适合我
Pixel 7 API 30
Pixel 7 API 30
|
启动
创建模拟器后,直接运行就可以看到hello world第一个程序运行界面
1
2
3
4
5
| #第一个程序核心代码位置
java/com/example/myapplication1/MainActivity.java
res/layout/activity_main.xml
这2个文件,代码会自动生成的,不需要手动创建
|
1
2
3
4
5
6
7
8
9
10
11
12
13
14
| package com.example.myapplication1;
import androidx.appcompat.app.AppCompatActivity;
import android.os.Bundle;
public class MainActivity extends AppCompatActivity {
@Override
protected void onCreate(Bundle savedInstanceState) {
super.onCreate(savedInstanceState);
setContentView(R.layout.activity_main);
}
}
|
1
2
3
4
5
6
7
8
9
10
11
12
13
14
15
16
17
18
| <?xml version="1.0" encoding="utf-8"?>
<androidx.constraintlayout.widget.ConstraintLayout xmlns:android="http://schemas.android.com/apk/res/android"
xmlns:app="http://schemas.android.com/apk/res-auto"
xmlns:tools="http://schemas.android.com/tools"
android:layout_width="match_parent"
android:layout_height="match_parent"
tools:context=".MainActivity">
<TextView
android:layout_width="wrap_content"
android:layout_height="wrap_content"
android:text="Hello World!,美好的一天开始了"
app:layout_constraintBottom_toBottomOf="parent"
app:layout_constraintEnd_toEndOf="parent"
app:layout_constraintStart_toStartOf="parent"
app:layout_constraintTop_toTopOf="parent" />
</androidx.constraintlayout.widget.ConstraintLayout>
|

找到应用
1
2
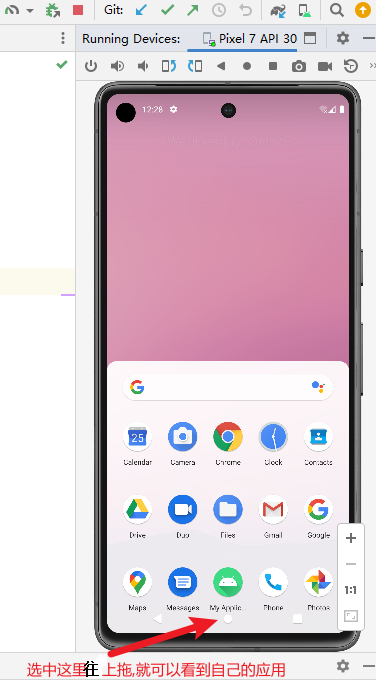
| #虚拟机中
在虚拟机中底部中间圆点,按住往上拖,就可以看到自己的应用
|

日志
1
2
3
4
5
6
7
8
9
10
|
Log.d("feiFoo", "12345");
Log.e("feiFoo", "12345");
Log.w("feiFoo", "12345");
Log.i("feiFoo", "12345");
Log.d("feiFoo", "12345");
Log.v("feiFoo", "12345");
|
真机调试
1
2
3
4
5
6
| 华为手机
01)usb 连接到电脑
02)设置->系统->关于手机->版本信息-> 然后连续点击8次左右,即可处于开发者模式
03)系统和更新->开发人员选项->USB调试
04)在 Android Studio 设备哪里会自动显示华为手机
|
adb
1
2
| adb全称: Android debug bridge
位置(找你的sdk安装位置): D:\soft_position\Java\Android\Sdk\platform-tools\adb.exe
|
图标
1
2
3
4
5
6
7
| 安装apk后,第一次看到的图标位于代码的:
app/src/main/res/mipmap-hdpi
app/src/main/res/mipmap-mdpi
app/src/main/res/mipmap-xhdpi
app/src/main/res/mipmap-anydpi
app/src/main/res/mipmap-xxhdpi
app/src/main/res/mipmap-xxxhdpi
|
清单文件 AndroidManifest.xml
1
2
3
4
5
6
7
8
9
10
11
12
13
14
| #清单文件 AndroidManifest.xml
这个文件中包含了APP配置信息,系统需要根据里面的内容运行APP的代码,显示界面
#allowBackup 是否备份
#android:icon 指定在手机屏幕上显示的图标
#android:label 指定app在手机屏幕上显示的名称
#android:roundIcon 指定APP的圆角图片
#android:supportsRtl 是否支持阿拉伯语/波斯语这种从右往左的文字排列顺序,为true表示支持,false表示不支持
#android:theme 指定角标风格
#<activity android:name=".MainActivity" 应用启动后,打开的第一个页面是哪个activity
#相当于路由,入口
启动任何一个没有在清单中定义的Activity时都会抛出一个运行时异常。
|
显示界面和逻辑
1
2
3
4
5
6
7
8
| 在xml中描述样式
在java中写逻辑
#xmlns:android : xmlns(全名: xml name space) 命名空间
#属性
match_parent 容器宽高
wrap_content 包裹宽高
|
第二个程序
1
2
3
4
5
6
7
8
9
10
11
12
13
14
15
16
17
| package com.fei.myfei;
import androidx.appcompat.app.AppCompatActivity;
import android.os.Bundle;
import android.widget.TextView;
public class MainActivity extends AppCompatActivity {
@Override
protected void onCreate(Bundle savedInstanceState) {
super.onCreate(savedInstanceState);
setContentView(R.layout.activity_main);
TextView feiHome = findViewById(R.id.feiHome);
feiHome.setText("北京,你好");
}
}
|
1
2
3
4
5
6
7
8
9
10
11
12
13
14
15
16
17
18
19
| <?xml version="1.0" encoding="utf-8"?>
<androidx.constraintlayout.widget.ConstraintLayout xmlns:android="http://schemas.android.com/apk/res/android"
xmlns:app="http://schemas.android.com/apk/res-auto"
xmlns:tools="http://schemas.android.com/tools"
android:layout_width="match_parent"
android:layout_height="match_parent"
tools:context=".MainActivity">
<TextView
android:id="@+id/feiHome"
android:layout_width="wrap_content"
android:layout_height="wrap_content"
android:text="Hello World!"
app:layout_constraintBottom_toBottomOf="parent"
app:layout_constraintEnd_toEndOf="parent"
app:layout_constraintStart_toStartOf="parent"
app:layout_constraintTop_toTopOf="parent" />
</androidx.constraintlayout.widget.ConstraintLayout>
|
快速创建一个activity
1
| 在java的主文件 java/com/fei/myfei 右键 New->Activity->Empty Views Activity
|
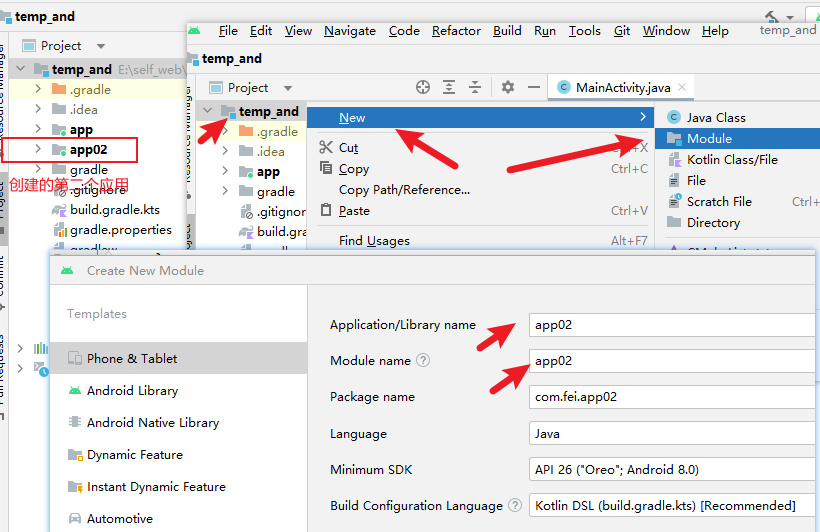
创建2个应用
在一个项目中创建2个应用
1
| Project 模式下,在文件最顶层右键->New->Module-> (起个名字,比如app02,下一步) ->Empty View Activity
|

快捷键使用
使用this
1
2
3
4
5
| RadioGroup btnRg_login = findViewById(R.id.btnRg_login);
btnRg_login.setOnCheckedChangeListener(this);
|
1
2
3
4
5
6
7
8
9
10
11
12
13
14
15
16
17
18
19
20
21
22
23
24
25
26
27
28
29
30
| package com.fei.myfei;
import androidx.appcompat.app.AppCompatActivity;
import android.os.Bundle;
import android.view.View;
import android.widget.RadioGroup;
public class Fei03Activity extends AppCompatActivity implements View.OnClickListener, RadioGroup.OnCheckedChangeListener {
@Override
protected void onCreate(Bundle savedInstanceState) {
super.onCreate(savedInstanceState);
setContentView(R.layout.activity_fei03);
RadioGroup btnRg_login = findViewById(R.id.btnRg_login);
btnRg_login.setOnCheckedChangeListener(this);
}
@Override
public void onClick(View v) {
}
@Override
public void onCheckedChanged(RadioGroup radioGroup, int CheckId) {
}
}
|
让变量定义到类上面
1
2
3
|
ck_remember = findViewById(R.id.ck_remember);
|
1
2
3
4
5
6
7
8
9
10
11
12
13
14
15
16
17
18
19
20
21
22
|
public class Fei03Activity extends AppCompatActivity implements View.OnClickListener, RadioGroup.OnCheckedChangeListener {
private TextView tv_password;
private EditText et_password;
private Button btn_forget;
private CheckBox ck_remember;
@Override
protected void onCreate(Bundle savedInstanceState) {
super.onCreate(savedInstanceState);
setContentView(R.layout.activity_fei03);
RadioGroup btnRg_login = findViewById(R.id.rg_login);
btnRg_login.setOnCheckedChangeListener(this);
tv_password = findViewById(R.id.tv_password);
et_password = findViewById(R.id.et_password);
btn_forget = findViewById(R.id.btn_forget);
ck_remember = findViewById(R.id.ck_remember);
}
}
|
- xxx
其他
Android基础入门教程
Android 开发者>Jetpack>room


