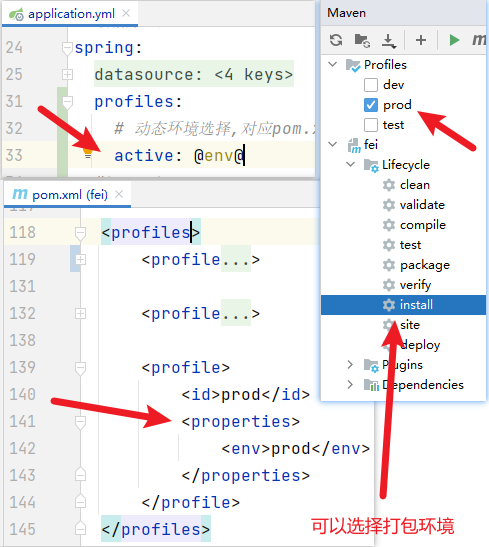
springBoot -分环境打包
springBoot -分环境打包
application.yml文件配置
1
2
3
4
| spring:
profiles:
active: @env@
|
pom.xml 文件配置
1
2
3
4
5
6
7
8
9
10
11
12
13
14
15
16
17
18
19
20
21
22
23
24
25
26
27
28
| <profiles>
<profile>
<id>dev</id>
<properties>
<env>dev</env>
</properties>
<activation>
<activeByDefault>true</activeByDefault>
</activation>
</profile>
<profile>
<id>test</id>
<properties>
<env>test</env>
</properties>
</profile>
<profile>
<id>prod</id>
<properties>
<env>prod</env>
</properties>
</profile>
</profiles>
|
打包测试

启动jar包
1
2
3
4
5
6
7
8
9
|
java -jar fei-0.0.1-SNAPSHOT.jar
java -jar fei-0.0.1-SNAPSHOT.jar --spring.profiles.active=prod
java -jar fei-0.0.1-SNAPSHOT.jar --server.port=8072 --spring.profiles.active=prod
nohup java -jar java -jar fei-0.0.1-SNAPSHOT.jar > ./fei-8072.out 2>&1 &
nohup java -jar java -jar fei-0.0.1-SNAPSHOT.jar > ./fei-8072.out 2>&1 &
ps -aux | grep java
|
使用Nginx代理
1
2
3
4
5
6
7
8
9
10
11
12
13
14
15
16
17
| server {
listen 80;
server_name demo.hexo.com;
root "E:/self_web/git_dev/vue/zFei_vue/dist";
location / {
try_files $uri $uri/ /index.html;
index index.html index.htm;
}
location /api/ {
proxy_pass http://127.0.0.1:8072/api/;
}
}
|
底部
xxx没有了

