css 属性float,六个基本规则
css 属性float,六个基本规则
css 属性float,六个基本规则
规则一
元素一但浮动后,脱离标准流,然后向左或者向右平移,一直平移直到碰到了所处的容器的边框,或者碰到另外一个浮动的元素
规则二
浮动元素不能与行内级内容层叠,行内内容会被浮动元素推出
比如:行内级元素: inline-block元素、块级元素的文字内容
1
2
3
4
5
6
7
8
9
10
11
12
13
14
| <style>
div {
float: left;
background-color: #c0c0c0;
}
span { background-color: #eee8aa; }
strong { background-color: #dda0dd; }
</style>
<span>我是span</span>
<strong>我是strong</strong>
<div>我是div,我浮动</div>
|

规则三
行内级元素、inline-block元素浮动后,其顶部将于所在行的顶部对齐
demo中图片和网站用于设计网页这行文字,浮动后还是在这一行
1
2
3
4
5
6
7
8
9
10
11
12
13
| <style>
.container {width: 500px;}
img { float: left; }
</style>
<div class="container">
超文本标记语言(英语:HyperText Markup Language,简称:HTML)
是一种用于创建网页的标准标记语言。HTML是一种基础技术,
常与CSS、JavaScript一起被众多 <img src="http://localhost:5000/img/avatar.png" style="width: 50px;height: 50px;" alt="">网站用于设计网页、网页应用程序以及移动应用程序的用户界面
。
网页浏览器可以读取HTML文件,并将其渲染成可视化网页。
HTML描述了一个网站的结构语义随着线索的呈现,使之成为一种标记语言而非编程语言。
</div>
|

规则四
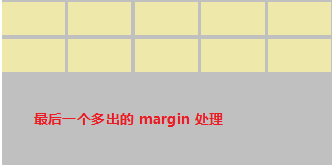
如果元素是向左(右)浮动,浮动元素的左(右)边界不能超出包含块的左(右)边界
规则五
浮动元素之间不能层叠
如果一个元素浮动,另一个浮动元素已经在那个位置了,后面的浮动元素将紧贴着前一个浮动元素(左浮动找左浮动,右侧浮动找右浮动)
如果水平方向剩余的的空间不够实现浮动元素,浮动元素将向下移动,直到有充足的空间位置
规则六
浮动元素的顶端不能超过包含块的顶端,也不能超过之前所有浮动元素的顶端
demo1:
1
2
3
4
5
6
7
8
9
10
11
12
13
14
15
16
17
18
19
20
21
22
23
24
25
26
27
28
29
30
31
32
33
34
35
36
| <style>
.container {
width: 990px;
height: 500px;
background-color: #c0c0c0;
margin: 0 auto;
}
.wrapper {
margin-right: -10px;
}
.item {
float: left;
margin-top: 10px;
width: 190px;
height: 100px;
background-color: #eee8aa;
margin-right: 10px;
}
</style>
<div class="container">
<div class="wrapper">
<div class="item item1"></div>
<div class="item item2"></div>
<div class="item item3"></div>
<div class="item item4"></div>
<div class="item item5"></div>
<div class="item item6"></div>
<div class="item item7"></div>
<div class="item item8"></div>
<div class="item item9"></div>
<div class="item item10"></div>
</div>
</div>
|

公式公式
width of containing block= ‘margin-left’ + ‘border-left-width’ + ‘padding-left’ + ‘width’ + ‘padding-right’ + ‘border-right-width’ + ‘margin-right’
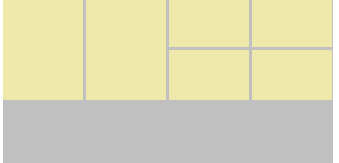
demo2
1
2
3
4
5
6
7
8
9
10
11
12
13
14
15
16
17
18
19
20
21
22
23
24
25
26
27
28
29
30
31
32
33
34
35
36
37
38
39
40
41
42
43
44
| <style>
.container {
width: 990px;
height: 500px;
background: #c0c0c0;
margin: 0 auto;
}
.item {
float: left;
margin-right: 10px;
width: 240px;
background-color: #eee8aa;
}
.itema {
height: 306px;
}
.itemb {
height: 148px;
}
.wrapper {
margin-right: -10px;
}
.item-last {
margin-top: 10px;
}
</style>
<div class="container">
<div class="wrapper">
<div class="item itema"></div>
<div class="item itema"></div>
<div class="item itemb"></div>
<div class="item itemb"></div>
<div class="item itemb item-last"></div>
<div class="item itemb item-last"></div>
</div>
</div>
|

demo3
1
2
3
4
5
6
7
8
9
10
11
12
13
14
15
16
17
18
19
20
21
22
23
24
25
26
27
28
29
30
31
32
33
34
35
36
37
38
39
40
41
42
43
44
45
46
47
48
49
50
51
52
53
54
55
56
57
58
| <style>
h2 {
margin: 0;
padding: 0;
}
a{
text-decoration: none;
}
.header{
width: 1100px;
margin: 0 auto;
background-color: #c0c0c0;
height: 49px;
}
.f-left{
float: left;
}
.f-right{
float: right;
}
.header-left{
font-size: 14px;
}
.header-left h2,.header-left span,.header-left a{
float: left;
margin-right: 20px;
}
.header-left h2{
font-size: 22px;
}
.header-left span{
}
.header-left .f-left{
margin-top: 9px;
}
.header-right{
margin-top: 9px;
font-size: 14px;
}
</style>
<div class="header">
<div class="header-left f-left">
<h2>美妆专区</h2>
<div class="search f-left">
<span>热搜词:</span>
<a href="#">面膜</a>
<a href="#">面膜</a>
<a href="#">面膜</a>
<a href="#">面膜</a>
<a href="#">面膜</a>
</div>
</div>
<div class="header-right f-right">
<a href="#">更多好货></a>
</div>
</div>
|

demo 4, 把2px,变为1px
1
2
3
4
5
6
7
8
9
10
11
12
13
14
15
16
17
18
19
20
21
22
23
24
25
26
27
28
29
30
31
32
33
34
35
36
37
| <style>
ul {
list-style: none;
margin: 0;
padding: 0;
}
.brand {
width: 1100px;
height: 180px;
margin: 0 auto;
}
.brand ul {
margin-left: -10px;
}
.brand ul li {
float: left;
width: 220px;
height: 167px;
background-color: #dda0dd;
margin-left: -1px;
border: 1px solid #ff6b81;
}
</style>
<div class="brand">
<ul>
<li></li>
<li></li>
<li></li>
<li></li>
<li></li>
</ul>
</div>
|

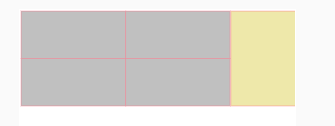
demo 5, 把2px 变为1px
1
2
3
4
5
6
7
8
9
10
11
12
13
14
15
16
17
18
19
20
21
22
23
24
25
26
27
28
29
30
31
32
33
34
35
36
37
38
39
40
| <style>
ul {
list-style: none;
margin: 0;
padding: 0;
}
.today{
width: 1100px;
margin: 0 auto;
}
.today ul{
margin-right: -6px;
}
.today ul li{
float: left;
width: 420px;
height: 190px;
background-color: #c0c0c0;
border: 1px solid #ff6b81;
margin-right: -1px;
margin-bottom: -1px;
}
.today ul .last{
float: right;
width: 260px;
height: 381px;
background-color: #eee8aa;
}
</style>
<div class="today">
<ul>
<li class="last"><a href="#"></a></li>
<li></li>
<li></li>
<li></li>
<li></li>
</ul>
</div>
|

清除浮动
浮动元素会脱离文档流(绝对定位元素也会脱离文档流),导致无法计算准确的高度,这种问题称为高度塌陷
01) 使用BFC清除浮动, 具体见BFC文章内容(常见清除浮动overflow:hidden)
1
2
3
4
5
6
7
8
9
10
11
12
13
14
15
16
17
18
19
20
21
22
23
24
25
26
| #BFC 中 overflow:hidden; 的demo
<style>
.fei {border:1px solid #ff6b81; margin:0 0 10px 0;}
p {margin: 0;}
.footer {border:1px solid #ff6b81;}
img {float:left;}
.fei { overflow:hidden;}
</style>
<div class="fei">
<img src="https://github.githubassets.com/images/icons/emoji/octocat.png" />
<p>对父元素使用 overflow:hidden;图片不会再跑到父元素外面 </p>
</div>
<div class="footer"> 我还是保持原来的位置</div>
#其他
overflow:hidden声明的真
正用途是防止包含元素被超大内容撑大
。应用overflow:hidden之后,包含元素
依然保持其设定的宽度,而超大的子内容
则会被容器剪切掉。除此之外,
overflow:hidden还有另一个作用,即它
能可靠地迫使父元素包含其浮动的子元素
|
02) 给父元素增加::after伪元素
1
2
3
4
5
6
7
8
9
10
| .clear-item::after {
content: "";
display: block;
clear: both;
height: 0;
visibility: hidden;
}
.clear-item{
*zoom: 1; /* 为了兼容IE6-7浏览器 */
}
|
浮动元素可以左右移动,直到遇到另一个浮动元素或者遇到它外边缘的包含框。浮动框不属 于文档流中的普通流,当元素浮动之后, 不会影响块级元素的布局,只会影响内联元素布局。此时文档流中的普通流就会表现得该浮 动框不存在一样的布局模式。当包含框 的高度小于浮动框的时候,此时就会出现“高度塌陷”。
清除浮动是为了清除使用浮动元素产生的影响。浮动的元素,高度会塌陷,而高度的塌陷使 我们页面后面的布局不能正常显示
因为 BFC 元素不会影响外部元素的特点,所以 BFC 元素也可以用来清除浮动的影响,因为 如果不清除,子元素浮动则父元 素高度塌陷,必然会影响后面元素布局和定位,这显然有违 BFC 元素的子元素不会影响外部 元素的设定。
03) 让父元素也同事浮动
其他
浮动常用在水平布局
公式Block-level, non-replaced elements in normal flow


