Ubuntu16 -nginx
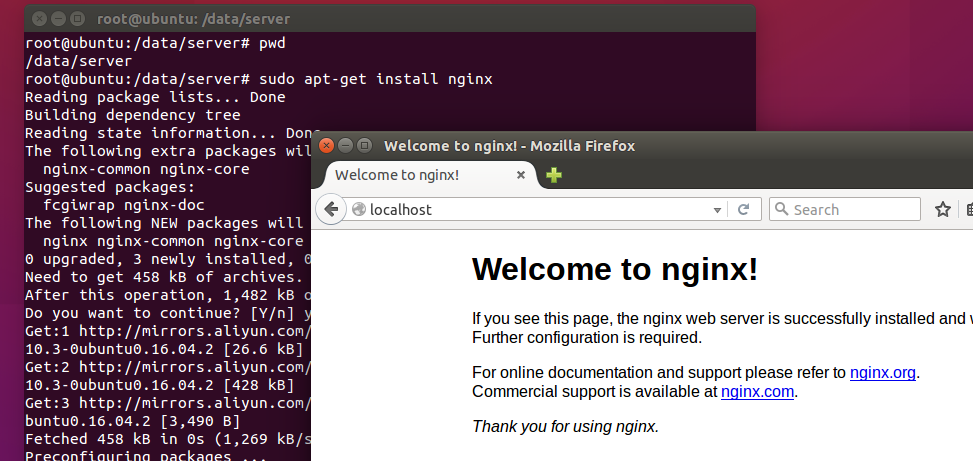
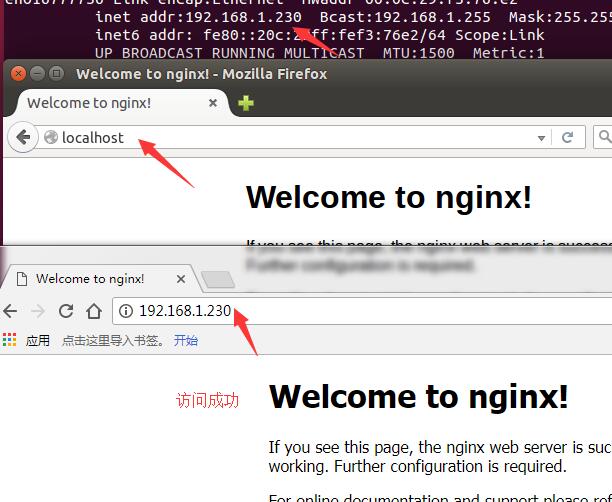
安装nginx 01 安装nginx 1 2 3 4 5 6 7 8 9 sudo apt-get install nginx 启动 ngnnx: sudo service nginx start 扩展centos nginx 重启 service nginx restart /etc/init.d/nginx stop /etc/init.d/nginx start
查看nginx配置文件目录 1 2 3 ps -aux | grep nginx 【返回结果包含安装目录】 nginx -t 【返回结果包含配置文件目录】 cat /etc/nginx/nginx.conf
编译安装02 安装必要的编译环境,[ 在ubuntu18中编译安装参考另一篇文章] Tengine 安装需要使用源代码自行编译,所以安装前需要安装必要的编译工具
1 2 3 4 5 6 7 sudo apt-get install build-essential sudo apt-get install libtool sudo apt-get install g++ centos 平台编译环境命令: yum -y install gcc automake autoconf libtool make yum install gcc gcc-c++
安装所需要的组件【pcre、openssl、zlib】,组件安装的时候注意路径
PCRE 1 2 3 4 5 6 7 8 !!!只需要解压即可,nginx安装的时候,指定到解压目录就ok wget ftp://ftp.csx.cam.ac.uk/pub/software/programming/pcre/pcre-8.38.tar.gz 解压到你指定的目录 tar -zxvf pcre-8.38.tar.gz -C /data/server/nginx_component mv pcre-8.38 pcre cd pcre/ ./configure --prefix=/data/server/nginx_component/pcre make && make install
OpenSSL 1 2 3 4 5 6 7 8 !!!只需要解压即可,nginx安装的时候,指定到解压目录就ok wget http://www.openssl.org/source/openssl-1.0.2.tar.gz 解压到你指定的目录 tar -zxvf openssl-1.0.2.tar.gz -C /data/server/nginx_component mv openssl-1.0.2 openssl cd openssl/ ./config --prefix=/data/server/nginx_component/openssl make && make install
Zlib 1 2 3 4 5 6 7 8 !!!只需要解压即可,nginx安装的时候,指定到解压目录就ok wget http://zlib.net/zlib-1.2.11.tar.gz 解压到你指定的目录 tar -zxvf zlib-1.2.11.tar.gz -C /data/server/nginx_component mv zlib-1.2.11 zlib cd zlib/ ./configure --prefix=/data/server/nginx_component/zlib make && make install
下载nginx安装包,我选择的是 1.4.2 1 2 3 4 5 6 7 8 9 10 11 12 13 14 15 16 17 18 19 20 21 22 23 24 25 26 27 28 29 30 31 32 33 34 35 36 37 38 39 40 41 42 43 44 45 46 47 48 49 50 51 ./configure --help 可以查看nginx的编译参数说明,这里可以看到nginx需要的【pcre、openssl、zlib】的源码位置 ,所有者三个东西可以不用需要编译安装,只需要有源码即可 wget http://nginx.org/download/nginx-1.4.2.tar.gz 解压到 /data/server/nginx 目录(可以根据实际情况选择目录): tar -zxvf nginx-1.4.2.tar.gz -C /data/server/ mv nginx-1.4.2 nginx cd nginx # ./configure --prefix=/data/server/nginx \ --with-http_ssl_module \ --with-pcre=/data/server/nginx_component/pcre \ --with-zlib=/data/server/nginx_component/zlib \ --with-openssl=/data/server/nginx_component/openssl make & make install 安装完的提示: ......... test -f '/data/server/nginx/nginx.conf' || cp conf/nginx.conf '/data/server/nginx/nginx.conf' cp conf/nginx.conf '/data/server/nginx/nginx.conf.default' test -d '/data/server/nginx' || mkdir -p '/data/server/nginx' test -d '/usr/local/nginx/logs' || mkdir -p '/usr/local/nginx/logs' test -d '/usr/local/nginx/html' || cp -R html '/usr/local/nginx' test -d '/usr/local/nginx/logs' || mkdir -p '/usr/local/nginx/logs' make[1]: Leaving directory '/data/server/nginx' [1]+ Exit 2 **************************** -------------如果执行make报错----------- cc1: all warnings being treated as errors objs/Makefile:447: recipe for target 'objs/src/core/ngx_murmurhash.o' failed make[1]: *** [objs/src/core/ngx_murmurhash.o] Error 1 make[1]: Leaving directory '/data/download/nginx-1.4.2' Makefile:8: recipe for target 'build' failed make: *** [build] Error 2 -------- 修改 /nginx-1.4.2/objs/Makefile---- 现在修改 /nginx-1.4.2/objs/Makefile 2 CC = cc 3 CFLAGS = -pipe -O -W -Wall -Wpointer-arith -Wno-unused -Werror -g 4 CPP = cc -E 5 LINK = $(CC) 去掉这里面的 -Werror 重新make,不要重新编译 --------------------------------------- make make install ****************************
注意配置的时候 –with-pcre 、–with-openssl、–with-zlib的路径为源文件的路径
检测是否可用 1 2 /data/server/nginx/nginx -t ./nginx -t
报错: 1 2 3 4 5 6 7 8 安装完会有异常,没有 pid 文件,那就创建一个 pid 文件 root@ubuntu:/data/server/nginx# /data/server/nginx/nginx -s reload nginx: [error] open() "/data/server/nginx/nginx.pid" failed (2: No such file or directory) root@ubuntu:/data/server/nginx# touch nginx.pid root@ubuntu:/data/server/nginx# /data/server/nginx/nginx -s reload nginx: [error] invalid PID number "" in "/data/server/nginx/nginx.pid" root@ubuntu:/data/server/nginx# /data/server/nginx/nginx -c /data/server/nginx/conf/nginx.conf root@ubuntu:/data/server/nginx# /data/server/nginx/nginx -s reload
命令 1 2 3 4 5 6 7 /data/server/nginx/nginx -t 【检查配置】 /data/server/nginx/nginx 【启动命令】 /data/server/nginx/nginx -s stop 【停止命令】 /data/server/nginx/nginx -s reload 【重启命令:】 pid出错时,可以使用这个: /data/server/nginx/nginx -c /data/server/nginx/conf/nginx.conf
编译安装03 下载 1 2 3 4 当前操作目录位置: /home/fei/server wget http://nginx.org/download/nginx-1.4.2.tar.gz tar -zxvf nginx-1.4.2.tar.gz -C /home/fei/server cd nginx-1.4.2
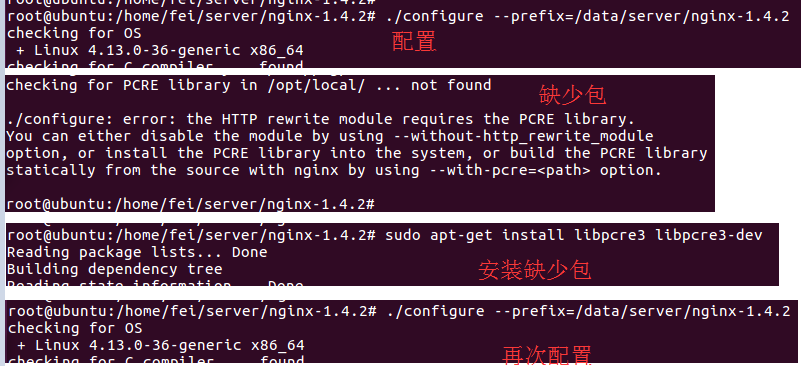
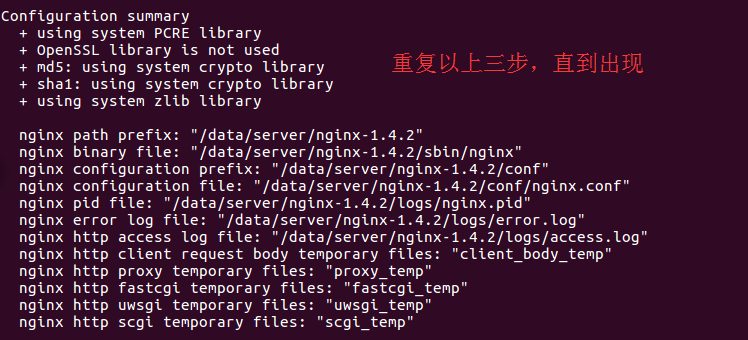
配置 1 2 3 4 5 6 7 8 9 10 11 12 13 ./configure --prefix=/data/server/nginx-1.4.2 发现少包,安装缺少的包 sudo apt-get install libpcre3 libpcre3-dev 再次配置【 一直到不在缺少包 】 ./configure --prefix=/data/server/nginx-1.4.2 【 常见缺少少包: pcre、openssl、zlib,安装这三个包命令如下】 sudo apt-get install libpcre3 libpcre3-dev sudo apt-get install openssl libssl-dev sudo apt-get install zlib1g-dev 配置 OK 后,继续操作
编译安装
检测是否可用 1 /data/server/nginx-1.4.2/sbin/nginx -t
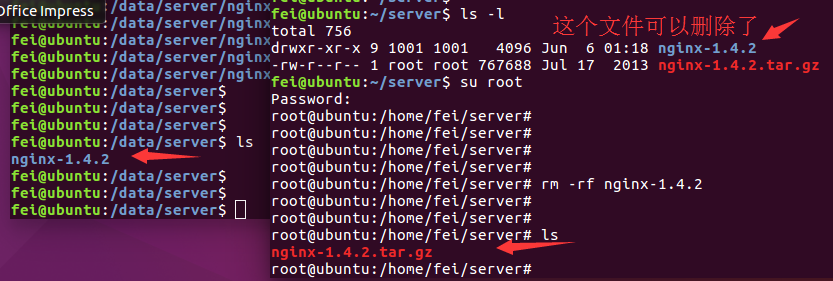
安装完成后,原文件就没有用了
命令 1 2 3 4 5 6 7 8 9 10 11 12 13 /data/server/nginx/nginx -t 【检查配置】 /data/server/nginx/nginx 【启动命令】 /data/server/nginx/nginx -s stop 【停止命令】 /data/server/nginx/nginx -s reload 【重启命令:】 /data/server/nginx/nginx -v 【查看nginx版本】 /data/server/nginx/nginx -V 【大写V 检查编译参数】 pid出错时,可以使用这个: /data/server/nginx/nginx -c /data/server/nginx/conf/nginx.conf 让nginx 返回http状态码 return 403; return 500;
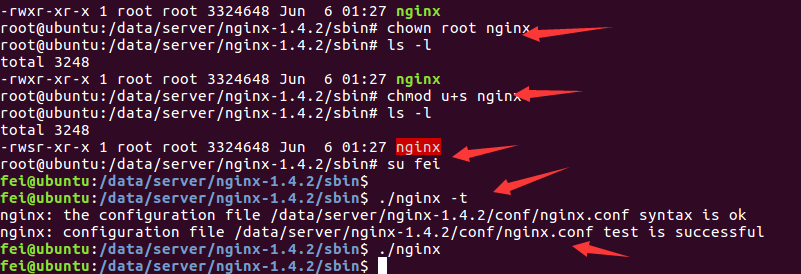
其他 让普通用户可以启动nginx 1 2 3 4 用root用户进入....nginx/sbin 然后chown root nginx chmod u+s nginx 然后通过普通用户就可以启动了。
windows中命令 1 2 3 4 5 6 7 8 9 10 11 12 13 14 15 16 17 18 19 在Nginx1.15.11目录下面执行命令 #查看nginx版本 C:\fei\Nginx1.15.11>.\nginx.exe -v #启动nginx (注意有个点) C:\fei\Nginx1.15.11>.\nginx.exe #停止nginx(注意有个点) C:\fei\Nginx1.15.11>.\nginx.exe -s stop #重新载入nginx(注意有个点) C:\fei\Nginx1.15.11>.\nginx.exe -s reload #检查nginx配置(注意有个点) C:\fei\Nginx1.15.11>.\nginx.exe -t #停止nginx所有进程 taskkill /f /t /im nginx.exe
nginx 官网
nginx 官网下载
nginx 官网linux安装
